Search This Blog

Sunday, 29 April 2012

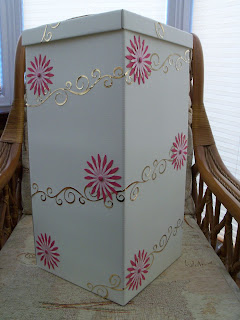
Wedding Post Box

I received a request to decorate a box for a Wedding at the end of the month.

I started with a plain ivory/cream box with a post slit in the lid.

I cut 12 swirls in gold mirror card using Sizzix Decorative strip die - Swirly. Theses were attached to the box so that they gradually worked their way up to the lid, this part was a bit time consuming to get both the spacing correct and also to glue on, especially when going round corners. The Swirl was continue onto the lid so a swirl went across two corners of the lid.

I cut 15 of the Sizzix Original die - Flower Daises #2. The largest flower was cut out of pink card, the medium flower cut from ivory card and the smallest flower was cut in both white and pink vellum.
The four flowers were all glued together at the centre and a ivory circle attached to hide the holes in the middle and the glue. A Candi pink faux brad was attached in the middle of each flower on 3d foam.

A special message was printed on to ivory card and mat and layered onto pink and gold card. This was fixed to the front of the box. A bride topper was fixed to the message. The flowers were attached, 3 on each side of the box.

The slit on the lid was also defined by matting ivory, pink and gold card and creating the slit in the centre, 2 further flowers where attached to the lid for added detail.


A similar box I decorated for another Wedding previously with a different colour scheme.


A Special Wedding Card

I had a request to make a specific Wedding card, I was even given a picture of the wedding dress and the room where the wedding was taking place and asked to create a themed card.

The wedding couple were cut out using 'Everyday Dolls' and 'Paper doll dress up' Cricut Cartridges. Faces where stamped using the Sizzix clear stamps.

The cream platform, curtain swags and pillars were created using the Cricut Gypsy device. The Pillars were cut out twice to add dimension and they were also embossed using the Sizzix Big shot machine.
The greeting was printed on the computer and mat and layered on to coloured card.

The back of the card was also decorated as follows.

Bear Grylles Themed Card

Another 8th Birthday card - a specific request this time for a Bear Grylles themed card.

My main starting problem with this request was I didn't actually know who Bear Grylles was. After a Google search and some information from friends I had a rough idea of the sort of theme required.

I reached for my Cricut Everyday Doll Cartridge initially and cut a safari man outfit and standard doll and spare head. The neckerchief was cut from white card and coloured in by hand.
The Crocodile and snake were cut from the same cartridge but the snake was stretched width ways using the Cricut Gypsy machine so it fitted nicely in the mans hands. Both the crocodile and snake were cut from brown coordination card both with a green core (different shades). Both parts were distressed with a sanding block to reveal some of the core colour. Black beads were fixed for eyes.

The mountain and  rough ground were both taken from the 'Paperdoll Dress Up' cartridge and both stretched width ways using the Cricut Gypsy device.

All were mat and layered onto cream and then brown card.

The message was printed out and fixed to a scalloped circle to finish.

Saturday, 21 April 2012

8th Birthday Card

My youngest son has been invited to a party this week so I need to make a card for the lucky Birthday Boy.

With some inside information I knew he has done a cart racing session, so I decided to make a card on that theme.

The racing man was cut from Cricut Everyday Cartridge, I altered the helmet to include some red flashes (as this was like the helmet he wore on the race day).

The racing car was taken from Cricut Decals Cartridge , I added the number 8 on the front of the car.

The background was created to look like a race track.

The rosette was created from a scalloped circle spellbinder die, the red scalloped circle had alternate scallops cut out to show the blue circle behind.

Ideal for a racing mad 8 Year old - lets hope he has a great Birthday and Party.

Tuesday, 17 April 2012

Harmonica Card

Well my challenge this week was-  can I make a card with a Harmonica on for a 90th Birthday.

I initially went for my Cricut Quarter Note Cartridge but unfortunately there was no Harmonica on there, so had to have a think and requested a picture to work from.


With the above picture in mind I when to my Cricut Gypsy in the hope of creating a Harmonica.
Created using rectangles I created the Harmonica shape, the  request was for 'Danny Boy' to be written on the top.

The background was created using a clear musical scroll stamp - Grunge Music (available from Lili of the Valley - http://www.liliofthevalley.co.uk/), this was distressed at corners using Tim Holtz Walnut and Tea Stain Dye pads. The stamped images were attached to a cream back ground which was mat and layered on to gold mirri card.

The Black musical notes were cut from Cricut Quarter Note Cartridge.

The message 'Happy 90th Birthday' was printed and then cut into a circle and mat and layered on to a gold coloured circle. An oval shape was cut from both cream and gold card and glued together , the harmonica was attached to the oval.


Lets hope the recipient and Pauline who requested I make the card like it.

Sunday, 15 April 2012

Birthday Card Using Tumble Tizzy CD

Birthday card made using Tumble Tizzy Digi stamp CD for a close friend this week.

Coloured in using Promarkers  and Copic pens and image cut out close to border line.

Matted on to a white & blue card cut into circle shape using Spellbinder Dies. This was then matted further onto a Paper Lace Doily (Tea Party Paper Lace Doilies by Dovecrafts).

Backing paper was matted onto black card and ribbon and message added at base of card.

Saturday, 14 April 2012

Birthday Card Using Forever Friends Layered Die

Birthday card made using Forever Friends Layered Die for a close friend this week.

Matted on to a white & brown card cut into circle shape using Spellbinder Dies. This was then matted further onto a Paper Lace Doily (Tea Party Paper Lace Doilies by Dovecrafts).

Backing paper was matted onto brown card and ribbon and message added at base of card.

Friday, 13 April 2012

Sailing Boat Leaving Card

Another request from my Husbands colleagues for a leaving card for a member of staff.

A sailing based card or a Blackberry based card. I opted for a sailing boat challenge.

I attempted a free standing boat - which ended promptly in the recyle bin. I then searched boat on my Cricut Gypsy device and was fortunate to find a sailing boat on a cartridge I owned.

The Sailing boat comes from Gypsy Wandering Cartridge (which was a bonus cartridge on the Gypsy). I hid the florish detail from the boat and cut the boat shape out in dark brown card, light brown card and white card three time for the sails.

The wording was created using Mickey Disney Font Cartridge , with a shadow background which was welded together prior to cutting, the blue letters were attached to the shadow with double sided tape.

The waves again were searched on the Gypsy device - found on 'Paper Dolls for Everyday' , I duplicated the wave section and increased the height only on one piece, these were then matted together using 1mm 3d foam.

Blue card was fixed to the base card. My next layer being a light blue grey coloured card had small holes punched at the corners. I googled Knots on the internet and learnt how to tie a figure of 8 knot, I made 3 similar knots for the corner detail.   The boat was all stuck with double sided tape with the exception of the sails that on one edge has 3d foam to create a fan effect.


On the reverse of the card , the kodak logo was created with a message 'From the KODAK Crew'


Wednesday, 11 April 2012

Moving Back In card

Moving in Card for a friend this week, slightly different as they have been doing lots of work to their house whilst they lived elsewhere - so in effect moving back in card.
The house was stamped onto white card, the stamp from Polka Doodles, Stamp Doodles by Nichola Hall.  This was matted on to a white & brown card cut into circle shape using Spellbinder Dies. This was then matted further onto a Paper Lace Doily (Tea Party Paper Lace Doilies by Dovecrafts).

Backing paper was faded at corners using Tim Holtz Walnut stain, paper was then matted onto brown card.

The message was printed onto white card and the shadow was cut from brown Coordination's card, both were cut using 'Stampin Up' Petite Pennants Builder Punch.

Sunday, 8 April 2012

Easter Gift Bags

Still using my new craft CD's Tumble Ted & Tumble Tizzy.

Tumble Tizzy this time and using the digi stamps CD and dress up Tizzy. Opted for the bunny outfit - ideal for Easter.

Tizzy coloured in using promarkers - only coloured in the face as the rest would be covered with backing card. I printed some background paper with spots on and then printed Tizzy  again on the spotted printed card. The bunny costume was cut out from the spotted paper and layered on top on the original Promarker coloured images.

The letters were printed out and coloured in using Promarker pens and cut using Spellbinders circle dies, a black shadow circle was also cut to layer onto to letters stood out more.

The Bunny Tizzy was matted on to coloured card cut into a circle, this was matted onto a white scalloped circle.


Plain gift bags were purchased from Hobbycraft.

The Bags were filled with some Easter Treats for both my boys - and I couldn't leave Hubby out so there was a treat bag for him too.

Monday, 2 April 2012

Someone Is 50 This Month

My neighbour Tim is reaching the BIG 50 this month and his wife asked me to make a couple of cards.

The first one being for lots of people to sign (for a surprise Party).

Tim works in the construction industry - but he used to be a window fitter so I decided to go on the window theme.

I used the 'Everyday Paper Doll' Cricut cartridge to make my Construction Man.

I created the window frame using my Cricut Gypsy machine and made the window using rectangles and welding them together, I cut the frame out 4 times. The window handle was created using a rectangle and a circle welded togther again cut multiply times to layer up. Acetate was used and stuck between two of the frame layers.

The tools were cut from 'Handyman' Cricut cartridge.


50th Husband Card

Another card for my neighbour - this time from his wife. Wendy said she wanted something comically - so I though Mr Potato Head would be a  good choice.

This was cut using 'Toy Story' Cricut Cartridge and layered up accordingly. This was matted and layered on to some contrasting card used from the image.

A specific message was printed and  also layered up on to matching card.

The 50's were created using the  Cricut Gypsy - using 'Mickey Font' Cartridge and cut twice in different coloured card stock.


The card pieces were fixed to a tent style card for a different style card.

50s Birthday Card for Tim

Finally the card we gave to Tim on his Birthday.

'Everyday Paperdolls' Cricut Cartridge used - Construction Man cut with hammer. Embossed background created using Universal Embossing Folder - In  Stitches.

Sunday, 1 April 2012

Cupcake Crafting CDs

I made a craft purchase this week - nothing unusual there as my husband would say!

Three craft CDs I saw advertised, Tumble Ted, Tumble Tizzy and Digistamps.

I am not a CD crafter really, I spend too much time on the computer for work, so the thought of logging back at home to craft never appealed to me until I saw these particular CD's - the images are lovely. I am still learning as you can personalise the images more and change colours but the first few I've made I am pleased with. On the Tumble Ted CD there is a football, rugby, golf, gardening, painter, digger, beer and cake themed cards and backing papers.


On the Girl Bear CD (Tumble Tizzy) - there are a cake, reading, writing, dressing up, partying, wardrobe, garden, flower and washing line themed cards.


 I still have the option as one CD is what they call digi stamps only so I can still spend evenings colouring little bears in, below are all part coloured in , thought I would practise the fur first before colouring all the outfits.  The digi stamps have all the themes above (ideal for personalising football shirts and rugby shirts) but also has additional images like clowns, astronaut, roller skater, winter bear(ideal for Christmas) and bunny rabbit. Time to get my Promarkers out and do some more colouring.