Search This Blog

Monday 18 February 2013

Baby Mason has arrived


Baby Mason arrived on Friday, so a card was needed for the proud parents Marissa and Steve.

Using Lili of the Valley 'special delivery' Stamp, I stamped the image using black Momento ink pad on to white smooth card stock. I coloured the stamped image in using Promarkers pens.

The coloured image was cut into a scalloped circle shape using Spellbinder Petite Scalloped circles dies, a shadow scalloped circle was cut from pale blue cardstock.

Blue scalloped photo corners were cut using Die namics Photo corners dies.

A patterned worded paper was matted onto blue card and fixed to the base card. The corner sections were fixed using double sided tape.

A special message was printed and a small feet charm fixed to it, this was matted on to blue cardstock.

The main image and message were fixed using 1mm 3d foam pads.

Sunday 17 February 2013

A Card for a Cycling Fanatic

Birthday card required this week for a friend who is a keen cyclist.

Using my 'The Best Of La Pashe' CD, I printed out the decoupage sheet with the cyclist image. I cut out the layered parts and fixed together using 1mm 3d foam pads.

A message was printed onto white card stock and cut to create a ribbon strip. The image was matted onto black card stock. a blue square was cut and matted onto the same black card stock. The ribbon section was fixed to the blue backing card.

The decoupage image was fixed using 1mm 3d foam pads. 

Thursday 14 February 2013

Valentine's Card for my Hubby

Time to make a card for my husband this week for the traditional Valentine's celebrations.

Using a digi stamp image , I printed direct onto white smooth card stock.

I coloured the image in using promarker pens.

The image was cut into a rectangle shape and matted onto brown card. A striped backing paper was matted onto a square of brown card stock and fixed to the base card. A different brown striped pattened paper was fixed across the card.

The main coloured image was fixed using 1mm 3d foam pads. A personalised message was printed and matted on to brown card and fixed across the topper section. Some die cut hearts were cut and matted to the card to finish.

Happy Valnetines Day Andy - Love you lots......

Tuesday 12 February 2013

House Mouse Coffee Card

A birthday this week for a special friend.

I decided to use an iamge from the House Mouse Project Book and CD Rom that I was bought for Christmas.

As Claire likes coffee and I love the design I used the papers from Project 16 in the book. I printed the 3 sheets out on to smooth white card stock.

All the layers were cut out and layered up using 1mm 3d foam pads, the mice's tails were glued down with paper glue as the parts are very tiny.

I created an easel style card using a 6" x 6" card. The main decoupaged image was matted onto pink card stock and fixed to the easel part of the card. The backing paper with coffee beans was again matted onto pink card stock and fixed to the base of the card using double sided tape.

A Happy Birthday message was printed and cut into a circle shape and a scalloped circle was cut from the pink card stock, this would create my stopper for the easel part of the card.

Using real coffee beans I glued 3 beans in each corner and three at the base of my stopper. The stopper was fixed using 1mm 3d foam pads. To make the coffee beans shine that bit more I used clear nail varnish was they were fixed in position.

Lets hope Claire likes her card and has a great day , her card definitely does have a coffee smell retained on it.  

Chloe's Birthday Card


Our God daughters birthday was this week, so a special card was required.

The image was taken from the The Best of La Pashe CD. The image was printed out onto smooth white card stock and each layer cut out. The sections were layered up using silicon gel, the sections were slightly curved before gluing.

The decoupaged image and matching backing paper was layered onto pink card stock  and fixed to the base card.

A personalised message was printed and fixed using 1mm 3d foam pads. Pearl stones were added to the four corners of the main topper.

Lets hope Chloe had a fantastic birthday and got all that she wished for.


Sunday 3 February 2013

1st Birthday Card for Logan

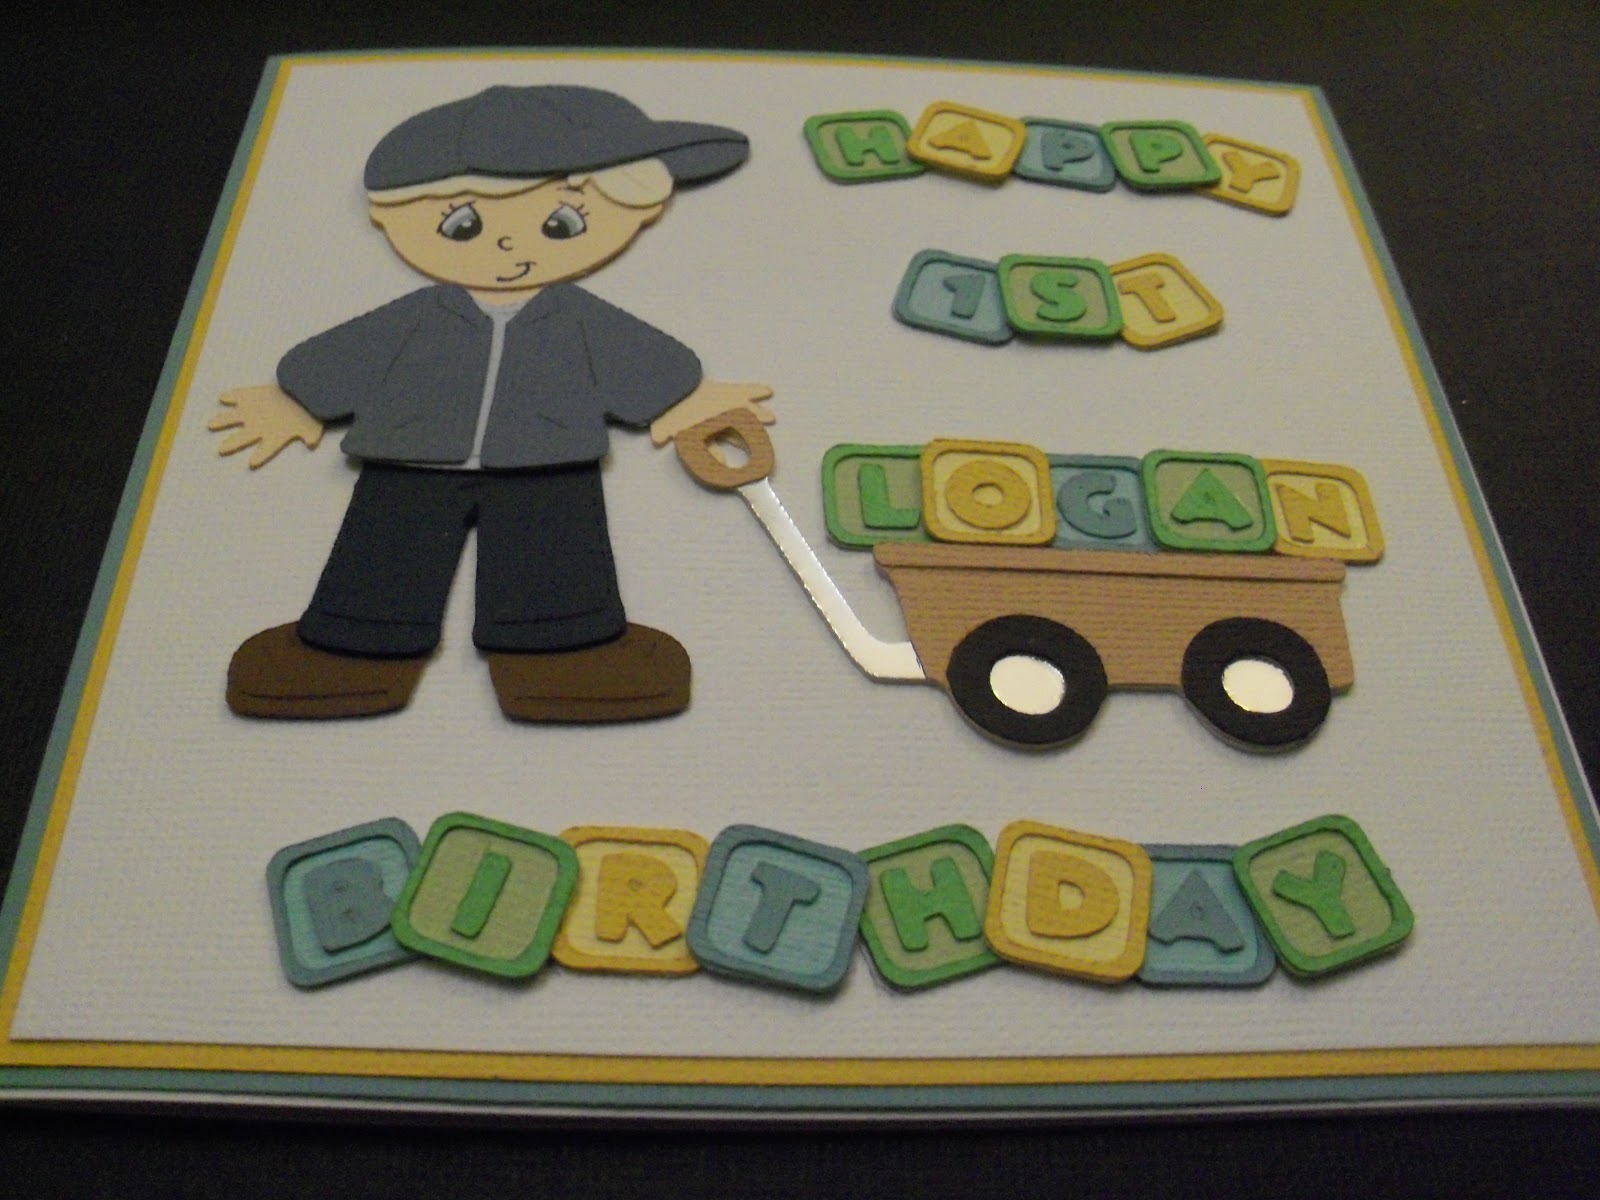
Another order request this week for a little boy who is soon to celebrate his 1st Birthday.

The lady ordering the card likes the Cricut Paper Doll images that I have created previously so wanted something on a similar theme.

The little boy was cut using both Cricut Paper Doll and Cricut Every Day Doll Cartridges. As I was given details of the colour of the little boys eyes I added colour to the eye section of the head, using promarker pens - I intend to do this in the future as it makes the eyes more effective.

The brick trolley was also taken from the same cartridges and was cut in silver mirror card, black and brown card stock and sections cut and fixed together accordingly to create the multi coloured trolley.

The toy bricks were created using the Cricut Gypsy hand held device. A square shape was taken from the Christmas Cheer Cartridge. The squares were repeated several times and were cut from paler cardstock in green, yellow and blue colours.

The square was then copied and reduced in size slightly and positioned inside the original larger square. The two squares were then combined as one image on the Gypsy device. This was copied several times to create lots of boxes.

The alphabet used was Cricut Mickey Font cartridge, the letters I wanted were typed and fixed within all the boxes. When these cut out they created a very narrow outer border and the letter.

The next part was very tricky and time consuming gluing all the letters and border sections to the paler squares - but I think for the end result worth the effort.

Once the glue had fully dried I cut 3 square sections in blue. yellow and white card. reducing in size. these pieces were matted and layered up and fixed to the base card.

The bricks, boy and trolley were all laid out onto the white card to position first. The bricks were stuck first , alternate letters were stuck with double sided tape and the letters in between were attached using 1mm 3d foam  pads to create a layered effect.

Finally the boy and the trolley were fixed to finish the card using double sided tape.


Friday 1 February 2013

House Mouse Get Well Card

Another get Well Card required this week for my work Colleague Karen, who has gone into hospital for a stomach operation.

Using the House Mouse Project Book with CD - Volume 1 ,that I was given as a Christmas present, I printed sheets applicable to project 12 in the book.

I cut all the decoupage sections out and layered up on to the main base image using 1mm 3d foam pads. The image was then attached to purple cardstock. A message was stamped onto white card  using Momento black ink, this was also matted on to purple card stock.

The flowered backing paper was matted into purple cardstock and fixed to the 6" x 6" base card. Green photo corners were cut using Die namics Photo corners dies. These were fixed to the backing paper section. The main image and message were fixed using 1mm 3d foam pads.