Search This Blog

Tuesday 28 May 2013

My New Die Cutters Binder Book


As my collection of metal cutting dies continues to grow and I had some spare thick card, I decided to create another die book this weekend to keep my dies close at hand and ready for use at any time.

I cut the card down to size C5 (half A4) and coloured round all the edges with walnut stain distressing ink. The front and back covers had two pieces of cream card stuck together to strengthen. Magnetic sheets were cut and glued onto one side of the cream card stock. Each sheet of card was then covered using various colours of Bazzill card stock. Two holes were then cut at one end to allow the rings to join the pieces together. The metal dies then fixed on each page where the magnets were hidden.
 
The front cover was decorated , by again using some of my dies - I cut the manikin shape out twice and cut the lighter brown section top and bottom and fixed to the darker brown base. Light and dark brown organza ribbon was tied at the waist. Three bobbin cards were cut and using my DMC embroidery threads I wrapped them round the bobbins and fixed using double sided tape.
 
The phrase Chrissie's dies was created previously using the Cricut Gypsy Machine so I cut this out in brown card, this was attached to some cream card cut using spellbinder dies. The book was finished off by tying ribbon around the silver rings and gluing the topper pieces. Tape measure ribbon was attached top and bottom of the front cover and four photo corners were cut to finish the corners of neatly. 


Matthew's Sporty Birthday Card

A special friend's son's birthday this week, and Matthew is going to be 16. As they are quite a sporty family, the image from Kimsies Whimsies seemed an ideal theme for his card.

I cut all the decoupage elements out and layered them onto the main image using 1mm 3d foam pads.

I mounted the main image onto plain black card stock and attached to an A5 card.

A personalised message was printed and fixed to the base of the card and 2 black diamante gems were added to finish.

Lets hope Matthew has a fab day...


Friday 24 May 2013

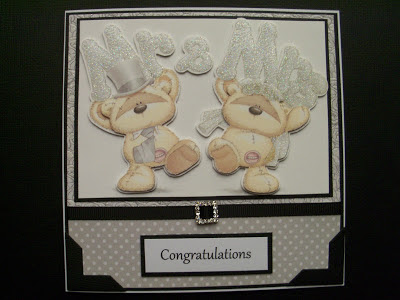
Mr & Mrs - Wedding Cards

A request this week for a wedding card. I was given free reign on this order but I thought about the friend who made the request. Knowing the type of cards she likes I opted to prepare a choice of two cards.

Using Fizzy Moon Decoupage Pack - Mr & Mrs, I prepared all the pieces from 2 of the decoupage pages, I built up the images using 1mm 3d foam pads. I matted both the images onto black card stock. Using the backing papers provided in the pack I matched to papers together and matted these onto black card stock. Black grosgrain ribbon was fixed across at the join and a silver diamante ribbon buckle was added to both cards.

Congratulation messages were printed and matted on to black card stock and fixed to the card using foam pads.


X Box Birthday Boy


Bit of a late posting on this card. the little boys birthday was back at the end of April.

Request was for a card with a boy on and a game console. Lili of the Valley stamp - Computer fun was the ideal stamp for this card.

I stamped the image using black Momento Ink onto white smooth card stock.

I chose the balloon backing paper first and selected Promarker pens to match, using blues. reds and orange colours to colour the image in. Faux stitching were drawn around the design and the white card was matted onto red card stock.

The backing paper was matted onto blue card stock and fixed to the base card. Four decorative corners were cut in red card using Die namics Photo corners dies to add detail to each corner.

A personalised message was printed and fixed to blue card and both this and the main image were fixed to the backing paper using foam pads.


Elegant Dresses Birthday Card

A Birthday Card required for a special friend and one of my sons Godmother.

I bought these stamps from Alexandra Big Stamp Show back in April and couldn't wait to use them.

I stamped each dress onto patterned card stock of a green design and yellow design.

I stamped all three dresses again onto white card stock. I coloured the manikin top part using Promarker pen  - satin colour.

I cut the dresses out of the green card and fixed these over the stamped image on the white card. Further smaller sections of the yellow stamped image were cut and again fixed to the image on the white card stock. To increase the shadow and pleats of the dresses I used Propmarker pen - Marsh green colour to add colour to the patterned card, following the shadowing shown on the stamp. Promarker pen - Honeycomb colour was used to add colour to the yellow section.

Small pearl diamante were added to the two outside dresses to create necklace effects. All three images were matted onto green card stock.

The same patterned backing card was used for the background , a narrow strip of green ribbon was used to hide the joins and to add detail. The whole back section was then matted onto green card.

The three images were fixed to the backing section using 1mm 3d foam pads. Finally a message was printed and matted onto green card and fixed to the base of the card.

I hope Mary had a fantastic birthday.


A Birthday Card for Amy

Little Amy's birthday - so a card to reflect her personality.

Using a Lili of The Valley image 'Milly just for you'.  I coloured the image in using Promarkers pens and created a shadow effect around the design using Promarker Ice Grey 1. Faux stitches were drawn round the edge of the rectangle, this was matted onto blue card.

Two contrast papers taken from Lili of the valley Paper pad - Candles and cake were cut and joined together, blue ric rac ribbon was fixed across the join. The backing section was matted on to blue card stock.

Four scalloped corners were cut from blue card using Die namics Photo corners dies to add detail to each corner.

To finish a personalised message was printed and matted onto blue card and fixed to the card using 1mm 3d foam pads.