Search This Blog

Thursday, 15 June 2017

Farewell gift to a great Year Head /Mentor


Time to make a farewell gift to one of my sons teachers who is his Year Leader also. 

I decide to create something on a coffee theme - teachers are always drinking coffee - right.

I created the card using my new electronic die cutting machine , the image I already had I just had to add his surname and cut from green and white card stock.  The green cut section was matted and layered onto a white circle and the black cut die image was attached to the middle.
Using my old Cricut electronic die cutting machine I cut the words thank you out of green and white card stock. The white letters where inserted into the green section and fixed to the top and bottom of a white square piece of card which was matted onto a 6" x 6 " card. 
The named coffee image was attached using 1mm 3d foam pad and fixed to one side of the card.

The coffee cup was cut using Die namics coffee cup die , each section was cut out of various coloured card and layered up accordingly the finished image was also attached using 1mm 3d foam pads.

To accompany the card I created, I decorated a white mug with the same coffee image using Vinyl - I'm still leaning using vinyl this was cut again on my newer machine the Brother Scan n Cut - I attached the green section first and then fixed the black cut section.  Could have been a bit straighter but always difficult attaching to a curvy product.

Good luck to Mr F in the future,  hope he ends up with another nice year group to look after.


Thursday, 2 March 2017

Anniversary tile

Another small creation for Mum & Dad to celebrate their wedding anniversary
Had wanted to try this technique our for a while so their anniversary was an ideal opportunity for a first attempt.

Using 'all that glitters' font I created the names section in the Brother Scan n cut canvas software. I then transferred this to my Brother Scan n cut machine and cut the section from white Oracle 651 vinyl. Using a font on my machine I then cut their surname in capitals using black vinyl. 


The final section cut from white vinyl was Est 1957 ( again cut using a font on my machine). 

The hardest part of this creation was applying the the vinyl to the tile without any air bubbles , I wont liar I did have to redo a couple of letters before I was happy with it.


The base of the tile I covered with a section of cork sheeting to protect any surface they place it on. 

A Diamond of a celebration


Time to make a card for a special couple and a special occasion as my Mum and Dad celebrate their Diamond wedding anniversary.

Using the Sue Wilson Heart of Heart dies, I decided to create a glittered heart of turquoise , white and silver smaller hearts - fiddly fitting all the hearts back in the white glittered base but worth the effort with the finished result.
I had a scanned photograph of Mum & Dad on their wedding day so I used this in one heart, a section of their marriage certificate (a copy of) in the third and the final heart I typed a personalised message.


Using my Cricut Gypsy and Disney Mickey Font cartridge I created the two panels 'mum and dad' and 'Diamond' using silver and turquoise glitter card.
Remaining hearts were added behind the main heart shapes and between each panel section to fiinish.


Wednesday, 15 February 2017

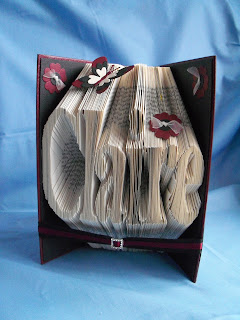
A Book fold for Claire

50th birthday wishes to a dear friend and ex work colleague.

I decided on a book fold creation, as Claire has always been an avid reader, I hope she doesn't get upset for doing this to a book.

I calculated the pages required for the name Claire and calculated the correct start page of the book.

I folded all the letters and then got to start decorating the outside cover of the book. I decided on a black, cream and burgundy colour theme.

I cut flowers out from burgundy card stock and buttons from black card, I then attached the two with cream organza ribbon.


I attached two pieces off black card on the inner sides of the book , helping makeing the folded name pop out more. I also added a ribbon and buckle section across the front of the book opening, this was fixed to the outside cover of the book with strong double sided tape.


 I decorated the outside of the book with cream and black card stock , adding cut photo corners to add detail.The cut flower pieces where fixed using a heated glue gun.  I also cut three butterflies out of burgundy, black and cream card these were attached on both outside covers and on the folded section of the book .


Tuesday, 14 February 2017

A Coffee Style Valentine card

A card request for a Valentine card, not to sloppy or jokey.

We decided on a coffee cup style card, with pink and blue colouring. 

Using dienamics coffee cup die I cut two cups out of patterned card stock and plain brown card stock. Two  patterned background papers were cut and pale blue ribbon attached at the join, this was matted onto both blue and pink card stock for the base of the card. Four photo corners were cut from blue card stock and added to each corner for added detail. 

The coffee cup pieces were attached together using a combination of both 1mm foam pads and double sided tape, thin craft string was wound around the coffee cup label sections, prior to fixing. 


Valentine Heart Card

Time to make a valentines card for my lovely husband.

Decided on a style of card which I tried out at Christmas.

Using my Cricut Gypsy device I found a heart shape and applied this on my Gypsy device. I then added a further tab on the saved file and started to add my words in based around the heart shape. Once the words were positioned correctly and it did still resemble a heart shape I cut this out of white card stock.


I then used Creative Expression Noble double pierced square dies to cut  a square from white card stock for the base section and then a frame from white card also to frame the heart. A frame was also cut from red glitter card but was trimmed on all sides to fit on the white frame. 
Using the Brother Scan n Cut machine I cut a black frame slightly larger than the white frame to add a border. The framed section were fixed together using double sided tape and then attached to the white card using 1mm foam pads. The glitter section under the worded heart was also fixed using 1mm foam pads to add further height and dimension. 

The whole frame part and heart wording was then fixed to the base white section which was finally matt and layered on to red glitter card to finish. 

Friday, 10 February 2017

A handbag of a card for Chloe

Time to create a card for our goddaughters birthday.

I decided to try my new die out from Tonic - Kensington Handbag. 

I cut the relevant parts out and attached accordingly using strong double sided tape, I added black cosmic shimmer liquid in drops to the embossed cream card,

The silver buckle was attached with a heat glue gun to make it secure , the strap does move also.

Due to the depth of the card a box was created using two a3 cardsheets to complete,.


Monday, 6 February 2017

Haven't update my blog for a while so here goes a brief catch up of what I've been up to over the last 6 months - the detail maybe brief until I get to recent cards created

Not a style of card I usually make, was quite hard to create but think the end result was just right.


Friday, 27 January 2017

Haven't update my blog for a while so here goes a brief catch up of what I've been up to over the last 6 months - the detail maybe brief until I get to recent cards created

Happy Birthday wishes to my crafty friend and work colleague. Happy birthday Karen - Have a great birthday. Not quite like Buster or Joe but still cute.

Love these Tim Holtz stamps.


Saturday, 21 January 2017

Haven't update my blog for a while so here goes a brief catch up of what I've been up to over the last 6 months - the detail maybe brief until I get to recent cards created

Birthday card request for Kai's 1st Birthday - this one personalised with his name and Nephew - Choo Choo


Haven't update my blog for a while so here goes a brief catch up of what I've been up to over the last 6 months - the detail maybe brief until I get to recent cards created.

Another VW Cushion completed, thank you Slightly Sheepish for the pattern, which is great, so pleased with my new bug cushion. I seem to be running out of room on my chair


Thursday, 19 January 2017

Haven't update my blog for a while so here goes a brief catch up of what I've been up to over the last 6 months - the detail maybe brief until I get to recent cards created.

Now to create one of my Christmas craft presents even some sweets included - happy crafting

Sock Turtle under construction this evening - scary bit next - time to cut the sock