Search This Blog

Thursday, 25 February 2016

Look who's 60 !!!

Time to make a card for my husbands mate, who is an avid Tottenham supporter , celebrating a rather large birthday this month.

The theme of the card was obvious bearing in mind his football team preference. 
I made this using my Cricut Create machine and the Cricut Gypsy. Cartridges used were Soccer and Disney - Mickey Font.
I used my Gypsy Device and selected the football shirt (from the Soccer Cartridge) and hid all the detail cut so I had a basic shirt shape, I then welded the shirt, boot (shadow feature) and ball (shadow). I positioned the name and numbers within the shirt, the font taken from Disney - Mickey Font. This was cut out using the main football shirt colour.
I also cut in a contrast colour the name and number again to insert in the main shirt once main cut completed. 
I cut the shirt again in the blue bazzill card stock to add the collar and sleeve detail.
I cut 2 further boot shadows in white Bazzill card stock.
I cut the ball (detailed cut) and two boot (detailed cut) in bazzill black card stock. I attached the boots and football detail cuts over the relevant shadows.
The 2nd Boot was fixed on main shirt using 3d foam.
The 'Happy' and 'Birthday' banners were  created using the Cricut Mickey Mouse font Cartridge and cut out from a white section of card, the letters were cut again in blue card and inserted into the relevant sections.

The card was 7" x 7" in size. The two word strips were added to the top and bottom of the card and matted onto blue card. A white section was added in between.

The shirt section was attached to part of the middle of the card.
Two Spurs emblem were printed  and fixed tot he centres of two  rosette's created and added to the white strip at the top of the card.   
As a finally decoration , my husband being a watford support and both teams being in the premiership this year , the score 6-0 in Watford's favour was added to the rear of the card - as a private joke- not sure Gerry will see the funny side.


Dee the optician is 50

Card request for an male optician this month.

I used a die cutting set from X Cut 'Suit dies'. The pieces were cut from black and white card stock and patterned paper.

Background patterned paper created on the Serif software , using an image of spectacles repeated over the page , this was printed onto Lili of the Valley patterned blue paper. This was matted onto blue and black glittered card stock and fixed to a 5"x 7" base card. 

The die cut shape was fixed using double sided tape to the base card. 

For added embellishment two pairs of glasses were cut from glittered black card stock ,these were fixed to the top of the card.

A personalised message was printed and matted onto coloured card and fixed to the base of the card.


Tuesday, 16 February 2016

Cricut Teen card

Ideal card for that 16 year old. 

Using the Cricut Teen Cartridge, I selected an image that looked like Aisha, a fitness theme style of clothing was requested using the colour red. 

I cut the image as instructed in the Cricut instructions, main doll layers in black, brown, grey and red.  The sections were glued together and the remaining hair section attached to the top.

The clothes were cut and fixed to the main body and the shoes were cut in both white and red and layered up.

The embossed background was created using Cuttlebug Happy Birthday embossing folder, embossed onto white card and matted onto black card stock. Spot and happy birthday worded card were used to create the background section. A black ribbon was fixed across the join and a diamonte ribbon buckle used. The background papers were matted onto a square shaped black card and fixed to the base card.

A personal message was printed and fixed to the lower section of the card.

Happy Birthday Sweet 16

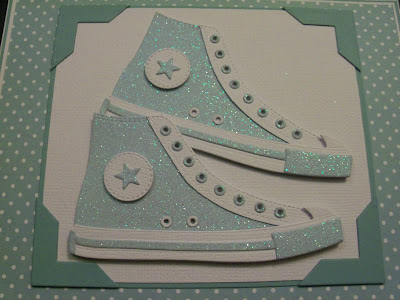
Time for another converse style shoe card - but this time glittery.

I cut two boots out in both white and light blue glitter card stock. I cut the white main boot section down where the eyelets are of the card and fixed this with double sided tape to the blue boots. I then glued the blue eyelets to the white section - very fiddly but well worth it. Two white eyelets were fixed to the main boot section.

The white sole section was fixed to the main boots with 1mm 3d foam pads, added blue sections were added to the sole for more detail.


I cut two glitter stars out and cut the circle sections out , these were fixed to the main boots with 3d foam pads.


Using some matching blue dot and happy birthday phrased card I created the background section , narrow blue ribbon was fixed at the join,  the patterned background card were then fixed to both a white and blue card mat and fixed to the 6" x 6" base card. Four photo corners were die cut to add detail to the corners. Finally a happy birthday message was printed and matted onto blue card stock to finish.


Sunday, 14 February 2016

To My Valentine

Time to make my lovely husband a Valentine's card.

I had purchased Sue Wilsons Heart of Hearts die and decided to use this as my first card using the new die.

I printed a message onto white American Craft card and cut this using the smaller solid heart shape, two red hearts were cut using the biggest plain heart for the mat of both parts.

I cut the main die with the hearts in the heart out of white glittered card stock.

The hearts of hearts die was then cut multiply time using white, black and red glitter card to create all the small hearts , some were very small 3mm across only.

Now the challenging part was to put the hearts back into the main white cut glittered section, I did this doing small sections at a time. When completed this section was then matted onto the red larger heart.
A square shape was cut out of white card that was matted onto red and black card and fixed to the base card sized 6" x 6". Another time time consuming part (but well worth it for the end result) was to glue each individual heart onto the white backing card,  This was all done with my husband in the lounge with me and he didn't even notice.
To finish it off I used all the unused hearts and enclosed them with the card as confetti.